Chalmers Advanced Python
Lab 3: A web application for tram networks
Advanced Python Course
Chalmers DAT690 / DIT516 / DAT516
2025
by Aarne Ranta & John J. Camilleri
Purpose
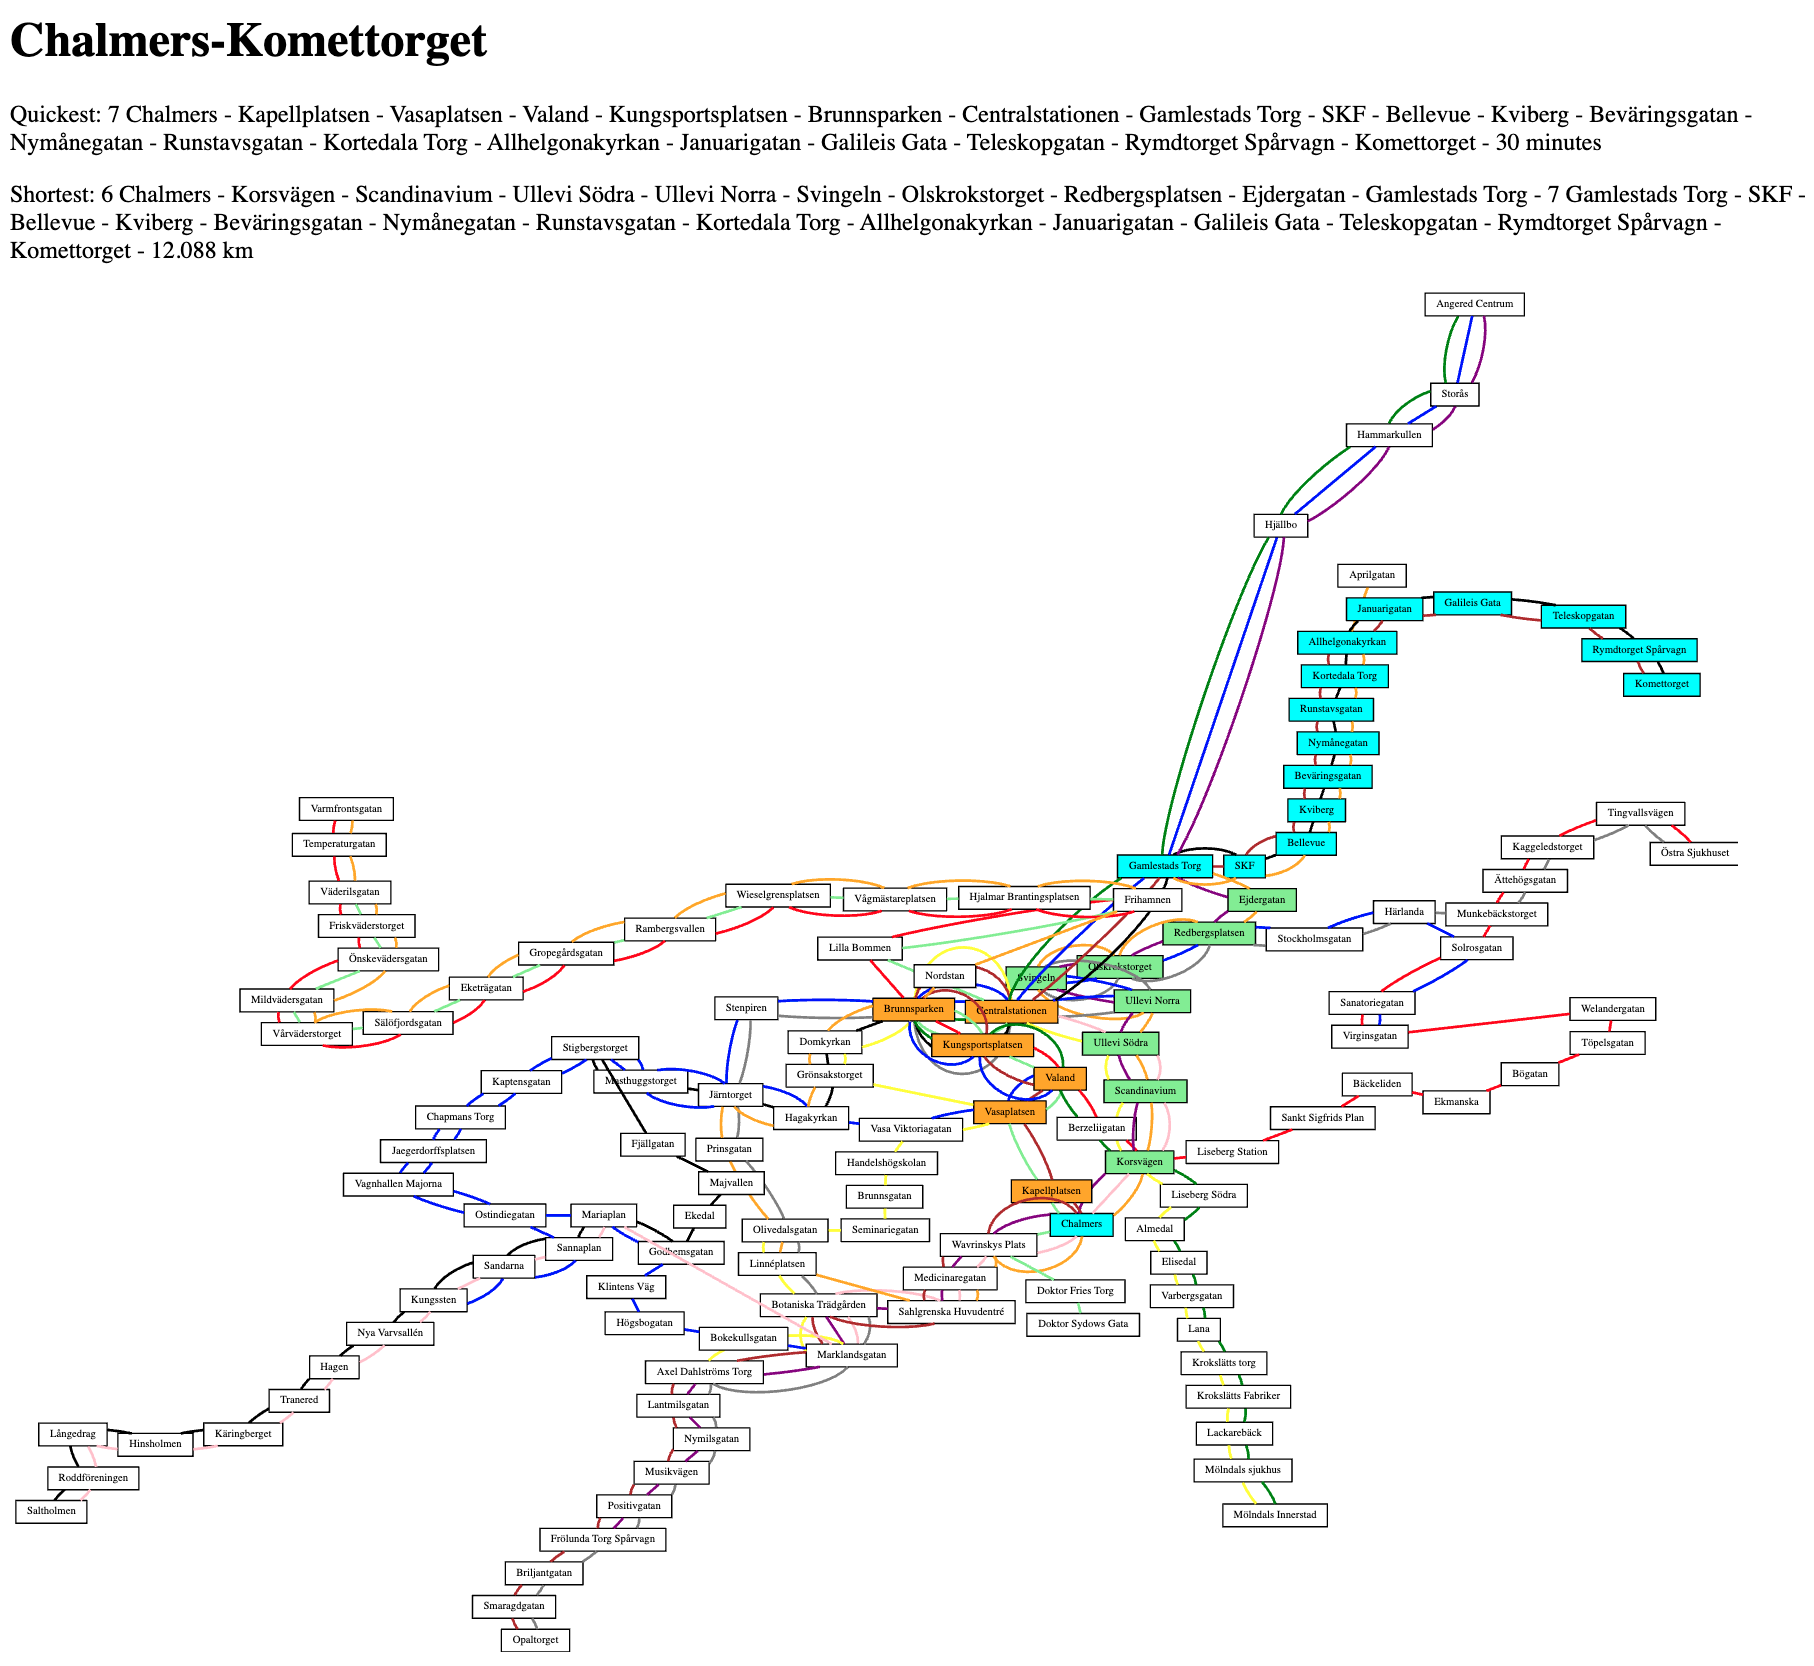
The purpose of this lab is to build a web application replicating some functionalities of apps such as Västtrafik’s Travel Planner. Your application will:
- display the complete map of tram lines
- highlight shortest paths in terms of time and geographical distance
- calculate total travel time by taking changes into account
- show actual departures from any stop by clicking on it
Here is an example screenshot:
In some more detail, here is what the three different screens should look like:
Unlike the official app, ours will not have access to the actual timetables, but just to the distances and times as defined in Labs 1 and 2.
This is of course a severe simplification, but on the other hand,
our app will be usable for any transport system that can be
represented by the class TramNetwork.
Clicking on the created map will give access to actual traffic information from Västtrafik.
Another difference from the official app is that we only run ours in a safe localhost environment.
Thereby we do not have to deal with security issues, and it will also be much easier for all groups to finish the project.
The learning outcomes include:
- visualization with more details on positions and colours
- simple front-end construction with HTML
- putting everything together by using a web application framework, Django
- more details of
graphvizlibrary, various libraries belonging to the Django framework - virtual environments, the
venvmodule
Getting started
We will follow the standard worklow for the Django framework. There are several tutorials available, for instance:
You can look at these for more information, but this document is aimed to be self-contained and sufficient for the lab.
Directory structure
For this lab, we will start from a blank slate and build up the project’s directory structure step-by-step. The final structure will look as follows. The files are obtained as follows:
- copied from
filesin this repository (marked 🔵) - created automatically by Django (unmarked in the diagram)
- slightly modified from automatic files (marked 🟡)
- explained in detail but written by you (marked 🟠)
- written by you (marked 🔴)
- generated by your code (marked ⚪️)
lab3
├── .gitignore 🟠
├── db.sqlite3
├── manage.py
├── mysite
│   ├── __init__.py
│   ├── asgi.py
│   ├── settings.py
│   ├── urls.py 🟡
│   └── wsgi.py
├── venv
│   └── ...
├── static
│   ├── tramnetwork.json ⚪️
│   └── tram-url.json 🔵,⚪️
└── tram
    ├── __init__.py
    ├── admin.py
    ├── apps.py
    ├── forms.py 🟠
    ├── migrations
    │   └── __init__.py
    ├── models.py 🟠
    ├── templates
    │   └── tram
    │      ├── find_route.html 🔵
    │      ├── home.html 🔵
    │      ├── images
    │      │   ├── gbg_tramnet.svg 🔵,⚪️
    │      │   └── generated
    │      │       └── ... ⚪️
    │      └── show_route.html 🔵
    ├── tests.py
    ├── urls.py 🟠
    ├── utils
    │   ├── __init__.py 🔴
    │   ├── color_tram_svg.py 🔵
    │   ├── graphs.py 🔴
    │   ├── trams.py 🔴
    │   └── tramviz.py 🔴
    └── views.py 🔵
Create Django project
Now we will prepare our environment, install the Django library, and initialize our Django project.
-
Create a directory for this project (not the same as in course GitHub):
$ mkdir lab3 -
Move inside it:
$ cd lab3 -
Create a Python virtual environment (maybe not necessary, but the best practice):
$ python3 -m venv venvThis will create the directory
venvwith lots of things in it, but you don’t need to concern yourselves with its contents. - Activate the virtual environment:
-
on Linux/Mac:
$ source venv/bin/activate -
on Windows:
$ venv\Scripts\activate.bator
$ venv\Scripts\activate.ps1Which of these two commands will work depends on what shell you are using. If unsure, try both.
You should now see the string
(venv)prefixed to your command line prompt. -
-
Install the necessary Python libraries into the virtual environment:
(venv) $ pip install django==5.2.7 (venv) $ pip install networkx==3.5 -
Create a new Django project with:
(venv) $ django-admin startproject mysite .(the last dot
.is necessary: it refers to your working directory, where it creates a directory namedmysiteand the filemanage.py).
At later times (every time you resume working on the project), only the activate step (4) is needed.
Initialize database
This step is needed to initialize the database:
$ python manage.py migrate
It creates a database (in the file db.sqlite3), which is a standard part of any Django project, even if we don’t use it in this lab.
Run web server
Now we can start the web server with:
$ python manage.py runserver
...
Starting development server at http://127.0.0.1:8000/
...
Open the URL above in a web browser to check if the installation succeeded. You should see a generic Django-generated page, which tells you one important thing: that your server is up and running.
Create the tram Django app
Now that we have a basic Django server set up, it’s time to start customising it for our task. For this we will create a Django “app” with the name tram:
$ python manage.py startapp tram
This creates the directory tram, with a lot of predefined contents, but also many things that you will have to complete with your own code.
To recognize this file in your Django website, add the line:
'tram.apps.TramConfig',
to the end of the INSTALLED_APPS list in mysite/settings.py.
Create model
Create a data model for route searches in tram/models.py:
from django.db import models

class Route(models.Model):
    dep = models.CharField(max_length=200)
    dest = models.CharField(max_length=200)

    def __str__(self):
        return self.dep + '-' + self.dest
Each instance of our model will contain a departure and destination stop, stored as strings. Then migrate the model to the database:
$ python manage.py makemigrations tram
$ python manage.py migrate tram
You will see that your db.sqlite3 file has contents now, but they are in a binary format that you cannot read.
Note: In this lab, the application does not add any data to the database, but its schema (the Route class) is used to structure the queries made via the route search form.
This is known as the MVT Design Pattern (Model-View-Template):
- a model (in
tram/models.py) is a class that defines a type of data - a view (to be added to
tram/views.py) is a function that processes a user request and returns a template - a template (to be added to
tram/templates/tram) is an HTML file that shows the data
The database could also be manipulated in the SQL language, but one of the things Django does is generate SQL queries from Python code, so that you usually don’t need to use SQL directly. This is known as ORM, Object-Relational Mapping.
Update URL patterns
Edit the generated mysite/urls.py so that it contains the following:
from django.contrib import admin
from django.urls import path, include

urlpatterns = [
    path('admin/', admin.site.urls),
    path('', include('tram.urls')),
]
The admin URL is used for managing the website and requires a login. You can try and create users and passwords, but this is not needed in this lab.
The second path includes the URLs given in our tram app.
For this purpose, you have to create the file tram/urls.py:
from django.urls import path
from . import views

urlpatterns = [
    path('', views.tram_net),
    path('route/', views.find_route),
]
Each path has two required arguments:
- the path extending the hostname (seen in the URL field of the browser)
- the “view”, i.e. the function called when this URL is requested
Create views
In order for tram/urls.py to work, you have to edit tram/views.py, so that it contains the following:
from django.shortcuts import render
from .forms import RouteForm

def tram_net(request):
    return render(request, 'tram/home.html', {})

def find_route(request):
    form = RouteForm()
    return render(request, 'tram/find_route.html', {'form': form})
The former function is all we need to render the start page. The latter function creates a web form, but does not yet do anything with it; we will return to this later.
Of course, we also need to define the RouteForm class and the HTML files.
This is the next topic.
Create form
In order for the find_route view to work, we need to create a corresponding form in tram/forms.py:
from django import forms
from .models import Route

class RouteForm(forms.ModelForm):
    class Meta:
        model = Route
        fields = ('dep', 'dest',)
This new form RouteForm is linked to our data model Route.
We specifying which fields of the model should be present in the form, and Django will automatically create a web form for us.
Create templates
The HTML files to be created are actually templates, since they contain slots where dynamic data is inserted by the server. The templates reside in a sub-sub-sub-directory, which has to be created first:
$ mkdir tram/templates
$ mkdir tram/templates/tram
Copy the HTML template files from the files folder to the newly created tram/templates/tram, so that:
$ ls tram/templates/tram/
find_route.html    home.html   show_route.html
Create template images
Also create the images subdirectory:
$ mkdir tram/templates/tram/images
and copy the tram network image gbg_tramnet.svg into it.
Note that images in this folder can be used in templates (e.g. home.html) but are not served publicly by the web server; i.e. you cannot access it via a web browser using something like http://127.0.0.1:8000/images/gbg_tramnet.svg.
Now run the web server again. You will see a home screen with the gorgeous SVG image of Gothenburg tram network.
Dynamic images
Our application will dynamically generate a new image for each route that is requested. Create a subdirectory for these dynamically generated images:
$ mkdir tram/templates/tram/images/generated
To avoid adding any of these generated images to the repository, tell Git to ignore this folder by creating a .gitignore file in the top-level folder and add this line to it:
tram/templates/tram/images/generated/
Customise image (optional)
If you want, you can replace this standard image with your own one. The script create_network_picture.py does this for you by calling your own tram.py on your own tramnet.json file.
You can also try to make the picture nicer by changing positioning and other parameters.
But before doing this, make sure to implement the rest of the basic functionalities!
You can return to image generation in the task where you are expected to change the URLs in the tram stops. Right now, when you click at them, you should be taken to a Google search about that stop.
Render dynamic content
The form find_route.html does not find any routes yet.
You can submit queries, but when you press “Search”, the form just becomes empty without showing any result.
So now we want to add some basic functionality that actually shows the shortest path. The following things are needed:
- a “utility” function that actually calculates the shortest path (from Lab 2)
- an extended
find_route()function intram/views.py(to be copied fromfiles/views.py) - a template that
show_route.htmlshows the route that is found (already copied above)
Add utility functions
It is a good practice to create a separate directory for “non-Django” utility functions and create an empty __init__.py file in it, so that it is recognized as a package.
$ mkdir tram/utils
$ touch tram/utils/__init__.py
Copy the following Python files from files into tram/utils:
graphs.py, a mock-up, for the most part to be replaced by your Lab 2 versiontrams.py, a mock-up, for the most part to be replaced by your Lab 2 versiontramviz.py, finding the shortest paths and marking them in SVG; for you TODOcolor_tram_svg.py, actually making the colouring in SVG, no need for you to touch
Update views
Now that you have created the utility files, you can replace the simplified tram/views.py with the one given in files.
Now you can visit http://127.0.0.1:8000/route/, submit a query and get a response (although this is just using a dummy implementation for now).
Task 1: Implement shortest path functionality
It is now time to implement the core function in our app: calculating the shortest path between two stops.
Most of this work is to be done in the files in tram/utils.
They contain TODO comments that instruct you what to do.
The main function in the file tram/utils/tramviz.py, imported in tram/views.py, is show_shortest.
Its task is to:
- find the shortest paths (time and distance)
- use them to colour the stops in the network picture, dynamically generating a new image
- return the shortest paths as strings to be shown in the view
- return the file path to the dynamically generated image
Add colours
As the example for the search result page shows, we expect three different colours to be used:
- green for stops on the shortest path
- orange for stops on quickest path
- cyan for stops that are on both paths
You can also use some other colours if you prefer.
Other stops should be left white.
The default implementation copied from files/tramviz.py is a mock-up, which always shows the same colours and the same route.
You can of course also makes the HTML files look nicer if you have time!
Account for line changes
In Lab 2 shortest path, we ignored the effect of changing from one line to the other. This effect is a major factor that can make the “shortest time” and “shortest distance” differ significantly. Its implementation requires that we recognize when a change must be made and add a suitable number of minutes or meters to the cost.
One way to do this with the existing algorithms is to build a new graph for the network, where:
- vertices are pairs
(stop, line)for eachstopin the original graph and eachlinethan passes through it - every edge
(a, b)of the original graph is multiplied to edges((a, line), (b, line))for everylinethat serves bothaandb - edges are added between all vertices that have the same
stop - distances and transfer time between different stops are the same as in the original graph
- a special change distance and change time is added between vertices that have the same stop but different lines, e.g. 20 metres and 10 minutes respectively
Implement the specialize_stops_to_lines() function which builds such a graph. You can then run the Dijkstra algorithm with cost functions specialized_transition_time() and specialized_geo_distance() for finding the quickest and shortest paths respectively.
You will need to figure out how to use stop names as individual strings with this new graph containing vertices as tuples.
Task 2: Data validation
You should now have a working application which returns the shortest routes between two stops. But what happens when you enter a stop name that doesn’t exist (e.g. you make a typo)? The Django server doesn’t crash, but you will see an ugly error page and the HTTP response from the server will have status code 500 Internal Server Error.
Instead, we should gracefully handle incorrect user input by returning a more appropriate HTTP status such as 400 Bad Request and showing the user a suitable message.
Edit the find_route view in your trams/views.py file to check for incorrect input and behave accordingly. You can use the following, but the details are up to you:
from django.http import HttpResponseBadRequest
...
return HttpResponseBadRequest(f"Unknown stop name: {stop}")
Task 3: Add links to live traffic information
The main home page image gbg_tramnet.svg is not just a static image, but an SVG file which contains hyperlinks.
Currently, clicking on a stop name will search the Västtrafik website for that stop name.
Instead, we want clicking on a stop name to take you to Västtrafik’s live traffic information page for that stop, for example the page for Nordstan which has URL:
https://avgangstavla.vasttrafik.se/?stopAreaGid=9021014004945000
To do this, we need to:
- Create URLs for the traffic information page of each stop name, by finding the
Gidwhich corresponds to each stop. - Update the SVG file to replace the “search” URLs with these traffic information URLs.
Create URLs
The first challenge is to create the traffic information URLs corresponding to each stop name.
For this, we need the Gid of each stop.
An HTML page containing a full list of stop identifiers can be found in the file files/hållplatslista.html.
This file was captured from the original URL https://www.vasttrafik.se/reseplanering/hallplatslista/. It may look strange if you open it in your browser, but if you look at the HTML source in your text editor you will see that all stops and their Gids are in fact contained there.
So, your task is as follows:
- Investigate where and how
Gids are given in the HTML document. - Extract the
Gids of all tram stops from the document. - Create traffic information URLs for every stop.
- Save the stop-URL dictionary as a JSON file.
For step 2, you can use the standard library for parsing HTML. A slightly more convenient third party library which can be used for this is Beatiful Soup.
Update SVG
After this, you need to create a new SVG image with these new URLs. To do this:
- Run
files/create_network_picture.pymaking sure thatTRAM_URL_FILEandMY_TRAMNETWORK_JSONpoint to your URL dictionary and tramnetwork file, respectively. - Move the resulting file
my_gbg_tramnet.svgtotram/templates/tram/images/gbg_tramnet.svg
Note that this only needs to be done once for the entire project (not every time a request to the web server is made).
There is no need to copy create_network_picture.py from files to tram/utils or any such place.
After doing this, make another search in your web application and click at some stop to verify that the link has been updated to take you to the traffic information page for that stop.
Submission
Submit all the files that are needed to run your application by committing them to your repository, but take care to avoid committing automatically generated files, in particular:
- the dynamic images in
tram/templates/tram/images/generated/ - your local Python virtual environment
venv/ - cache folders such as
__pycache__/which can be automatically created by your IDE
You should use a .gitignore file to avoid committing such paths to the repository.
The .gitignore file itself should be committed to the repository.
Peer review
Before inspecting your code, we will organize peer reviewing sessions, where each group tests and reviews another group’s work. The review report that you write will be added as a part of your submission. More details about peer reviewing.